Another one of those dishes I forgot to take a picture of before it was too late! This was my pumpkin pie substitute to suit the gluten-free way of life. I made this earlier in the day as I wasn't too confident in the recipe - it turned out great and I wish I had just made it while we were eating dinner. Not only does it smell fabulous, the consistency was superior when it was sampled straight out of the oven as opposed to being warmed up later. Regardless, it's a unique Thanksgiving dessert that everyone could enjoy:
Pumpkin Pudding
1 can (15 ounces) pumpkin puree (Jason had pureed a pumpkin last year and we had a few containers still left in the freezer)
3/4 cup light brown sugar, packed
1 1/4 teaspoons ground cinnamon
1/2 teaspoon ground nutmeg
1/4 teaspoon ground ginger
1/2 teaspoon salt
1 1/2 teaspoons vanilla extract
3 large eggs, slightly beaten
1 3/4 cups half-and-half or light cream
Butter a 1 1/2-quart casserole. Heat oven to 350°. In a large mixing bowl, combine all ingredients and whisk or beat on low speed until blended. Pour into the prepared casserole and bake for 55 to 65 minutes, or until a knife inserted in the center comes out clean. If desired, serve with sweetened whipped cream and cinnamon sugar for sprinkling.
Serves 6 to 8.
MY REVIEW: I served this both with whipped cream and cinnamon sugar. Every seemed to enjoy it!
Showing posts with label gluten free. Show all posts
Saturday, October 8, 2011
Monday, September 12, 2011
Turkey, Butternut Squash & Zucchini Curry With Wild Rice
Dinner this evening was a bizarre combination of what we had in the fridge and what I felt like. No real recipe - ground turkey mixed with butternut squash and zucchini with a with lot of curry!
Sunday, September 11, 2011
Quinoa, Leek, and Corn Chowder
Today was the first day that really felt like autumn was here. There seemed to be a lot more leaves on the ground than yesterday and a jacket was necessary. This put me in the mood for some thick and hearty soup. I found this recipe in my much loved Quinoa 365 cookbook:
Quinoa, Leek, and Corn Chowder
Ingredients
1 tbsp butter
1 cup chopped onion
1 cup sliced leek (white part only)
1/2 cup qunioa
3 cups frozen corn
2 cups vegetable broth
1 red bell pepper, chopped
1/4 tsp salt
pinch of ground pepper
1/4 tsp cayenne pepper
5 saffron threads
In a large saucepan, melt the butter and sauté the onion and leek until the onion is tender and opaque, about 7 minutes. Add the quinoa and 2 cups of the corn; set aside the remaining corn to thaw. Cook for an additional 5 minutes, until the corn partially thaws. Add a few drops of the broth to keep it from sticking to the saucepan, if necessary.
Add the broth and bring to a boil. Reduce the heat, cover and simmer for 15 minutes or until the quinoa is completely cooked. Remove from the heat. Puree the cooked mixture with a hand blender or cool slightly and puree in 2 batches in a blender or food processor.
Return the mixture to low heat. Add the remaining 1 cup of corn and the red pepper, black pepper, cayenne, saffron and salt. Reheat and stir. Serve immediately. The soup can be stored in a seal container in the refrigerator for 2 days.
REVIEW: This was so filling! I followed the recipe exactly as shown, apart from the fresh chives sprinkled on top. I would make this again and it's very simple to make. Nothing fancy but a really great flavor with a hint of spice.
Quinoa, Leek, and Corn Chowder
Ingredients
1 tbsp butter
1 cup chopped onion
1 cup sliced leek (white part only)
1/2 cup qunioa
3 cups frozen corn
2 cups vegetable broth
1 red bell pepper, chopped
1/4 tsp salt
pinch of ground pepper
1/4 tsp cayenne pepper
5 saffron threads
In a large saucepan, melt the butter and sauté the onion and leek until the onion is tender and opaque, about 7 minutes. Add the quinoa and 2 cups of the corn; set aside the remaining corn to thaw. Cook for an additional 5 minutes, until the corn partially thaws. Add a few drops of the broth to keep it from sticking to the saucepan, if necessary.
Add the broth and bring to a boil. Reduce the heat, cover and simmer for 15 minutes or until the quinoa is completely cooked. Remove from the heat. Puree the cooked mixture with a hand blender or cool slightly and puree in 2 batches in a blender or food processor.
Return the mixture to low heat. Add the remaining 1 cup of corn and the red pepper, black pepper, cayenne, saffron and salt. Reheat and stir. Serve immediately. The soup can be stored in a seal container in the refrigerator for 2 days.
REVIEW: This was so filling! I followed the recipe exactly as shown, apart from the fresh chives sprinkled on top. I would make this again and it's very simple to make. Nothing fancy but a really great flavor with a hint of spice.
Wednesday, April 13, 2011
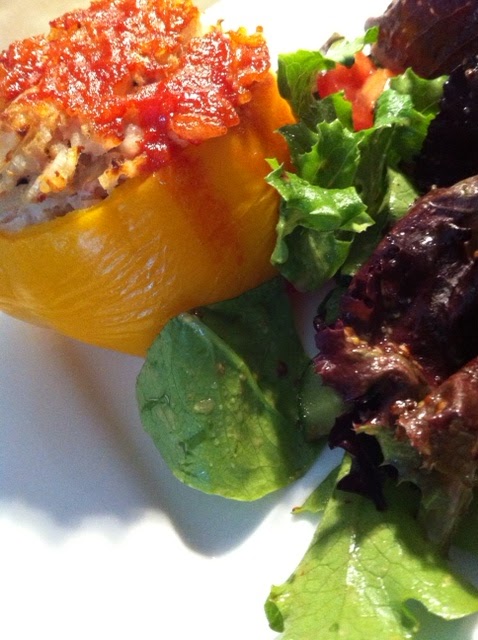
Stuffed Peppers & Baked Beans
*Ignore my weird spacing and font on this post - I am using Jason's laptop
These 2 recipes were from earlier this week and both from the Simply Recipes site that I've been frequenting.
First off, some of "Dads Stuffed Peppers" - there was also a "Mom's Stuffed Peppers" which looked pretty good too.... but here's Dad's:
Dad's Stuffed Bell Peppers Recipe
Next up, I made some "Baked Beans in Tomato Sauce" which I will be eating for the next few days!
Baked Beans in Tomato Sauce Recipe
These 2 recipes were from earlier this week and both from the Simply Recipes site that I've been frequenting.
First off, some of "Dads Stuffed Peppers" - there was also a "Mom's Stuffed Peppers" which looked pretty good too.... but here's Dad's:
Dad's Stuffed Bell Peppers Recipe
- Prep time: 10 minutes
- Cook time: 50 minutes
INGREDIENTS
- 4 bell peppers, any color (I made 3 and they were kind of squat)
- Salt
- 5 Tbsp extra-virgin olive oil (Wow! Don't need that much)
- 1 medium yellow onion, peeled and chopped
- 1 clove of garlic, peeled and chopped
- 1 lb of lean ground beef (Ground Turkey, about 3/4 of a styrofoam flat package)
- 1 1/2 cup of cooked rice
- 1 cup chopped tomatoes, fresh or canned (if using can, drain of excess liquid first) (I chopped fresh)
- 1 tbsp chopped fresh oregano or 1 teaspoon of dried oregano (dried)
- Fresh ground pepper
- 1/2 cup ketchup
- 1/2 tsp of Worcestershire Sauce (I didn't use this as it's not gluten free - at least my brand wasn't)
- Dash of Tabasco sauce (Louisiana Hot Sauce)
1 Bring a large pot of water to a boil over high heat. Meanwhile, cut top off peppers 1 inch from the stem end, and remove seeds. Add several generous pinches of salt to boiling water, then add peppers and boil, using a spoon to keep peppers completely submerged, until brilliant green (or red if red peppers) and their flesh slightly softened, about 3 minutes. Drain, set aside to cool.
2 Preheat oven to 350 degrees F. Heat 4 tbsp of the oil in a large skillet over medium heat. Add onions and cook, stirring often, until soft and translucent, about 5 minutes. Add the garlic and cook a minute more. Remove skillet from heat, add meat, rice, tomatoes, and oregano, and season generously with salt and pepper. Mix well. (You may find it easier to put the ingredients at this point into a large bowl and mix together with your hands.)
3 Drizzle remaining 1 tablespoon of olive oil inside the peppers. Arrange the cut side of the peppers up in a baking dish, then stuff peppers with filling. Combine ketchup, Worcestershire sauce, Tabasco sauce, and 1/4 cup of water in a small bowl, then spoon over filling. Add 1/4 cup of water to the baking dish. Place in oven and bake for 40-50 minutes (or longer, depending on how big the peppers are that you are stuffing), until the internal temperature of the stuffed peppers is 150-160°F.
As I only had 3 smaller peppers, I put the remaining stuffing into a small loaf pan and covered with the ketchup sauce. It cooked for as long as the peppers did.
Next up, I made some "Baked Beans in Tomato Sauce" which I will be eating for the next few days!
Baked Beans in Tomato Sauce Recipe
Prep time: 1 hour
- Cook time: 2 hours, 45 minutes
If you want to save time, you can used canned beans instead of dry. Use 3 or 4 15-ounce cans, drained and rinsed and proceed to step 3. If you want a vegetarian version, skip the bacon, increase the olive oil, and use vegetable stock.
INGREDIENTS
- 1 pound dry cannellini, borlotti or Great Northern beans (3 cans)
- 1 Tbsp olive oil
- 1/4 pound bacon or pancetta, roughly chopped (I didn't use this.. but would recommend you do!)
- 1/2 medium onion, chopped
- 4 garlic cloves, chopped
- 1 Tbsp fresh sage, minced (can sub fresh rosemary) (I only had dried sage)
- 1/2 to 1 teaspoon chile flakes (depending on how spicy you want it)
- 2 Tbsp honey
- 1/4 cup tomato paste
- 1 15-ounce can crushed tomatoes or tomato sauce
- 2 cups beef or chicken stock (use gluten-free stock for gluten-free version)
- Salt
- 1/2 cup chopped fresh parsley
- 2 Tbsp balsamic vinegar
METHOD
(I didn't add the bacon but here's the directions as posted on the website. I also do not have a heavy-bottomed pot so I dumped it all into a casserole dish before going in the oven)
1 Pre-soak the beans, either by covering with two inches of water and soaking overnight, or by pouring boiling water over them and soaking them for an hour.
2 Drain the beans and put them in a medium-sized pot and cover with 2 inches of water. Bring to a simmer, cover, reduce the heat to a low simmer and cook until the beans are just soft enough to eat, about 1 hour, give or take 15 minutes or so, depending on how old the beans are (older beans will take longer to cook).
3 Preheat the oven to 325°F. In a 3 or 4 quart heavy-bottomed, oven-proof, lidded pot such as a Dutch oven, heat the olive oil over medium heat. Add the bacon or pancetta and cook slowly until lightly browned and crispy.
4 Add the chopped onions and increase the heat to medium-high. Cook, stirring often, until the onions begin to brown. Use a wooden spoon to scrape any browned bits off the bottom of the pot.
5 Add the garlic, chile flakes and sage and cook for 1-2 minutes, then add the honey and tomato paste. Stir well to combine. Add the tomatoes or tomato sauce and the stock. Bring to a simmer. Taste for salt and add some if needed.
6 Drain the beans and add them to the pot. Stir well. Cover the pot and cook in the oven for an hour and fifteen minutes. If still a bit wet, remove the cover and cook for 15 minutes more. Note that the cooking time will depend on several things, the most important being how thoroughly the beans were cooked to begin with when they were simmered. If they are still a bit hard when they go in the oven, it may take several hours to soften them, once the tomato and honey have been added.
7 Right before serving, gently stir in the chopped parsley and balsamic vinegar. Taste for salt, add more if needed to taste.
Serve either hot or at room temperature.
These were both great recipes - Jason gave the peppers a 10/10! The beans make ALOT... would be good for a large family dinner or potluck. I loved the addition of balsamic vinegar and could really taste it.
Saturday, April 2, 2011
Honey-Mustard Lime Crock Pot Chicken
For this crockpot chicken, I did have to go and purchase the chicken drumsticks but everything else I had on hand. The ingredients are very simple and it takes 10 minutes to throw it all together. I found it on this Meal Planning website and it had already been adapted from a non-crock pot recipe on another blog:
8 chicken legs (I removed the skin as crock pot + chicken skin = slime)
1/2 cup honey mustard (or 2 tbsp honey mixed with 1/3 cup Dijon Mustard)
1 lime, juice and zest (or 3 tbsp lime juice)
2 garlic cloves, minced
1 tbsp soy sauce
Combine all ingredients in the slow cooker, and stir to evenly coat the chicken. Cook on low 6-8 hours or until chicken is cooked all the way through. I cooked on high for about 3 and a half hours. Serve with rice (and steamed broccoli!) to spoon extra sauce on top.
In the spirit of using up some of the things in the freezer, I made a gluten-free crisp with some frozen raspberries and cranberries from our vast collection of frozen fruit.
Now this - I really don't have a recipe for! I was trying to experiment with alternative, natural sweeteners as opposed to putting brown sugar in the topping. The topping is a mixture of rice flour, quick rolled oats (gluten free variety), honey, agave nectar, chopped walnuts & 1/8cup margarine. I baked it in the oven at 350 until it smelled good. Aren't I just the best recipe writer ever??
Both of these dishes were a success! Its amazing the things you can throw together when you really start digging around in the freezer.
8 chicken legs (I removed the skin as crock pot + chicken skin = slime)
1/2 cup honey mustard (or 2 tbsp honey mixed with 1/3 cup Dijon Mustard)
1 lime, juice and zest (or 3 tbsp lime juice)
2 garlic cloves, minced
1 tbsp soy sauce
Combine all ingredients in the slow cooker, and stir to evenly coat the chicken. Cook on low 6-8 hours or until chicken is cooked all the way through. I cooked on high for about 3 and a half hours. Serve with rice (and steamed broccoli!) to spoon extra sauce on top.
In the spirit of using up some of the things in the freezer, I made a gluten-free crisp with some frozen raspberries and cranberries from our vast collection of frozen fruit.
Now this - I really don't have a recipe for! I was trying to experiment with alternative, natural sweeteners as opposed to putting brown sugar in the topping. The topping is a mixture of rice flour, quick rolled oats (gluten free variety), honey, agave nectar, chopped walnuts & 1/8cup margarine. I baked it in the oven at 350 until it smelled good. Aren't I just the best recipe writer ever??
Both of these dishes were a success! Its amazing the things you can throw together when you really start digging around in the freezer.
Labels:
chicken,
crockpot,
dessert,
gluten free,
raspberries
Sunday, March 27, 2011
*Mom's Ground Turkey & Peppers
*Not my moms.
Before I get into this new recipe, let me say I have tried to post a few times in the last few weeks but things just weren't working out for me! My most recent attempt was crab cakes. Not only was the flavor bad, but they did not hold their shape. No sense posting a horrible recipe! I am still cooking and still eating however so don't fret. Hopefully I'll have some more successful recipes for you soon.
Now, check out this site I found for some gluten free recipes:
http://simplyrecipes.com/recipes/gluten-free/
As a very visual cook, I love the fact there's a picture beside each and quite often additional pictures of the steps. There's quite a few things in the list that I would like to try. While reading through them, I found that most of the ingredients are things I would normally have in my fridge or pantry. This works well with my project for the next 2 weeks: buy only fruits and vegetables for groceries and use what's already in the freezer in pantry. We have so many dried things and frozen things and pastas kicking around that I need to use up! They aren't going bad but they are taking up space and the collection seems to grow a little bit each time we do our Sunday grocery shop.
Here's what I tried tonight (with a package of already purchased & forgotten ground turkey):
2 Push the vegetables to the edge of one side of the pan and position that side of the pan so that it is off the burner, away from the heat. The empty part of the pan should be right over the burner. Add one or two more tablespoons of oil to coat the empty part of the pan. Put crumpled chunks of ground turkey in the pan, sprinkle with salt and chipotle or chili powder.
3 Cook the turkey without stirring until it is browned on one side, then turn the pieces over to brown the other side. Once the turkey is just cooked through, stir in the onions and peppers, and sprinkle with more salt and chili powder to taste. Remove from heat. Stir in fresh chopped parsley or cilantro.
Serve alone, or with steamed rice or noodles.
Serves 4.
To go with the turkey and peppers, I made some Russian Buckwheat (from the Italian Market). Despite the suspicious name, it is gluten free. It's also full of fiber and a nice change from the usual rice or quinoa. Once it's cooked I just add a little salt.
MY REVIEW: This was a good meal! I don't usually cook my ground turkey in that manner but it worked nicely and left the meat in larger pieces than usual. It was a quick and colorful dish.
JASON'S REVIEW: The turkey was hearty and delicious.
Before I get into this new recipe, let me say I have tried to post a few times in the last few weeks but things just weren't working out for me! My most recent attempt was crab cakes. Not only was the flavor bad, but they did not hold their shape. No sense posting a horrible recipe! I am still cooking and still eating however so don't fret. Hopefully I'll have some more successful recipes for you soon.
Now, check out this site I found for some gluten free recipes:
http://simplyrecipes.com/recipes/gluten-free/
As a very visual cook, I love the fact there's a picture beside each and quite often additional pictures of the steps. There's quite a few things in the list that I would like to try. While reading through them, I found that most of the ingredients are things I would normally have in my fridge or pantry. This works well with my project for the next 2 weeks: buy only fruits and vegetables for groceries and use what's already in the freezer in pantry. We have so many dried things and frozen things and pastas kicking around that I need to use up! They aren't going bad but they are taking up space and the collection seems to grow a little bit each time we do our Sunday grocery shop.
Here's what I tried tonight (with a package of already purchased & forgotten ground turkey):
*Mom's Ground Turkey & Peppers
Ingredients
- Olive oil
- 1 cup chopped yellow onion, including some chopped greens from scallions or green onions (just had the yellow onion)
- 1 bell pepper (red or yellow preferred), chopped (I used yellow)
- 2 cloves garlic, minced
- Kosher salt
- 1 lb ground turkey, preferably ground turkey thighs
- 1 teaspoon chipotle powder or chili powder (or to taste) (chili powder)
- 2 Tbsp chopped fresh parsley or cilantro (I used parsley)
Method
1 Heat 2 Tbsp olive oil in a large skillet on medium high heat. Add the chopped onions and bell pepper and cook until onions and peppers are softened, a couple minutes. Add the garlic and cook 30 seconds more.2 Push the vegetables to the edge of one side of the pan and position that side of the pan so that it is off the burner, away from the heat. The empty part of the pan should be right over the burner. Add one or two more tablespoons of oil to coat the empty part of the pan. Put crumpled chunks of ground turkey in the pan, sprinkle with salt and chipotle or chili powder.
3 Cook the turkey without stirring until it is browned on one side, then turn the pieces over to brown the other side. Once the turkey is just cooked through, stir in the onions and peppers, and sprinkle with more salt and chili powder to taste. Remove from heat. Stir in fresh chopped parsley or cilantro.
Serve alone, or with steamed rice or noodles.
Serves 4.
To go with the turkey and peppers, I made some Russian Buckwheat (from the Italian Market). Despite the suspicious name, it is gluten free. It's also full of fiber and a nice change from the usual rice or quinoa. Once it's cooked I just add a little salt.
MY REVIEW: This was a good meal! I don't usually cook my ground turkey in that manner but it worked nicely and left the meat in larger pieces than usual. It was a quick and colorful dish.
JASON'S REVIEW: The turkey was hearty and delicious.
Tuesday, February 22, 2011
Gluten Free Crepes
Crepes were always one of those things I never imaged I could successfully make. After I fell in love with a street crepe in Paris, I added it to my "list of things to do when I get home". I recently saw that local blogger Chris, from 'Eating Is The Hard Part', made some gluten free crepes! He used a flour mix from the GF Patisserie in Cochrane which I just so happened to make a stop at on Saturday. Wanting to try my new flour and craving a sweet treat, I attempted my first crepe. Here is the recipe, as posted on Chris's blog:
2 Cups GF Patisserie Flour mix
1 1/2 Cups Milk (adjust to make thin batter)
4 Eggs
1. Blend, or whisk the ingredients.
2. Pour 1/4 to 1/3 cup of batter into hot, greased pan.
3. Cook 1-2 minutes a side.
4. Remove to cutting board and fill with anything your heart desires. Ham. Cheese. Fruit. Ice Cream. Steak. Spinach…
My crepes were filled a thin layer of nutella and topped with stewed raspberries. I was very surprised at how easy these were to make! The crepe pictured above was my middle crepe - I made one thinner and one thicker than that. The thinner one was much easier to flip and tasted so delicate and perfect. I will definitely be trying these again soon and getting a little more creative with fillings and toppings.
2 Cups GF Patisserie Flour mix
1 1/2 Cups Milk (adjust to make thin batter)
4 Eggs
1. Blend, or whisk the ingredients.
2. Pour 1/4 to 1/3 cup of batter into hot, greased pan.
3. Cook 1-2 minutes a side.
4. Remove to cutting board and fill with anything your heart desires. Ham. Cheese. Fruit. Ice Cream. Steak. Spinach…
My crepes were filled a thin layer of nutella and topped with stewed raspberries. I was very surprised at how easy these were to make! The crepe pictured above was my middle crepe - I made one thinner and one thicker than that. The thinner one was much easier to flip and tasted so delicate and perfect. I will definitely be trying these again soon and getting a little more creative with fillings and toppings.
Friday, February 18, 2011
Chickpea & Sausage Soup
This lovely (or should I say... "lusty") soup was from the Edmonton Sun:
CHICKPEA AND SAUSAGE SOUP
This lusty soup has with an aroma that greets you as you walk in the door.
1 Tbsp. (15 ml) olive oil
3/4 lb. (375 g) fresh Italian sausage or chorizo (we used gluten-free Italian sausage from the Italian Market)
1 large onion, chopped
3 large cloves garlic, sliced
1/2 tsp dried thyme
1/4 tsp pepper
1 can chickpeas
1 carton (900 ml) sodium-reduced chicken broth
1 Tbsp tomato paste
Salt
2 cups lightly packed shredded spinach
In large heavy-bottomed saucepan, heat oil over medium heat. Add sausage; brown well, about 10 minutes. Let cool on cutting board. Slice thinly.
Meanwhile, drain off all but 1 Tbsp. (15 ml) fat. Add onion, garlic, thyme and pepper; saute for 5 minutes.
Drain and rinse chickpeas; mash half with fork. Add mashed and whole chickpeas to onion mixture along with sausage, chicken broth and tomato paste. Bring to boil, reduce heat to low; simmer covered until flavours blend and broth thickens slightly, about 30 minutes. (Make-ahead: Let cool 30 minutes. Refrigerate uncovered in containers until cold. Cover; refrigerate for up to 3 days; reheat.)
Taste, adding salt if desired. Stir in spinach; let stand 1 minute.
Makes 6 servings.
CHICKPEA AND SAUSAGE SOUP
This lusty soup has with an aroma that greets you as you walk in the door.
1 Tbsp. (15 ml) olive oil
3/4 lb. (375 g) fresh Italian sausage or chorizo (we used gluten-free Italian sausage from the Italian Market)
1 large onion, chopped
3 large cloves garlic, sliced
1/2 tsp dried thyme
1/4 tsp pepper
1 can chickpeas
1 carton (900 ml) sodium-reduced chicken broth
1 Tbsp tomato paste
Salt
2 cups lightly packed shredded spinach
In large heavy-bottomed saucepan, heat oil over medium heat. Add sausage; brown well, about 10 minutes. Let cool on cutting board. Slice thinly.
Meanwhile, drain off all but 1 Tbsp. (15 ml) fat. Add onion, garlic, thyme and pepper; saute for 5 minutes.
Drain and rinse chickpeas; mash half with fork. Add mashed and whole chickpeas to onion mixture along with sausage, chicken broth and tomato paste. Bring to boil, reduce heat to low; simmer covered until flavours blend and broth thickens slightly, about 30 minutes. (Make-ahead: Let cool 30 minutes. Refrigerate uncovered in containers until cold. Cover; refrigerate for up to 3 days; reheat.)
Taste, adding salt if desired. Stir in spinach; let stand 1 minute.
Makes 6 servings.
Thursday, January 20, 2011
Quinoa Salad, Falafel & Aero Garden
Although I have been cooking lots of great things lately, this week has just been so busy! Classes for work, doctors appointments and a leaky roof are just some of the things that have been occupying my time. Extra effort was put into making sure we had a healthy dinner every night however and I've got some great new recipes to share.
First of all - check out the Aero Garden on day 14:
It's a kitchen jungle! I still have not sampled anything but I've got my eye on that basil...
Now onto the recipes. Last week we had a little family get together and I brought a salad to share. Surprise, surprise - it was from my Quinoa 365 book! It's good for vegetarians, celiacs and those with lactose intolerance (all of whom were at this particular family get together):
Quinoa Chickpea Salad
2cups vegetable stock
1cup quinoa
1 can chickpeas, rinsed and drained
1cup diced red bell pepper (about 1 pepper)
1/3cup dried cranberries
1/3cup chopped walnuts
3tbsp chopped fresh parsley
Bring the stock and quinoa to a boil in a medium saucepan over high heat. Reduce to a simmer, cover and cook for 10 minutes. Turn the heat off and leave the covered saucepan on the burner for 4 more minutes. Fluff with a fork and allow the quinoa to cool.
Transfer the quinoa to a large bowl and mix in the chickpeas, red pepper, cranberries, walnuts and parsley. Chill before serving. Stays fresh in a sealed container in the refrigerator for up to 5 days.
The next recipe I wanted to share came from a book a co-worker brought to my attention called "The Gluten Free Bible":
While I have enjoyed the odd falafel pita in the past, I had never attempted to make them. This particular recipe also included a recipe for a tomato sauce to be served on top but I chose to just make the falafel:
Falafel Nuggets
2 cans chickpeas, rinsed and drained
1/2cup rice flour
1/2cup chopped parsley
1 egg
Juice of 1 lemon (or squirt of lemon juice)
1/4cup minced onion
2tbsp minced garlic
2tsp ground cumin
1/2tsp salt
1/2tsp ground red pepper or red pepper flakes
1/2cup canola oil (*I did not use this as I used the "variation" method to reduce fat content. I will write both methods however)
Preheat oven to 400F. Coat baking sheet with nonstick cooking spray (or parchment paper).
Combine chickpeas, rice flour, parsley, egg, lemon juice, minced onion, garlic, cumin, salt and red pepper in food processor or blender; process until well blended. Shape mixture into 1 inch balls.
(This is not the method I used) Heat oil in large nonstick skillet over medium-high heat. Fry falafel in batches until browned. Place 2 inches apart on baking sheet; bake 8-10 minutes.
*Variation Cooking Method - Falafel can also be baked completely to reduce the fat content. Spray the falafel lightly with nonstick cooking spray and bake 15-20 minutes, turning once.
Once I had made these, I wasn't too sure what to do with them. Apparently they're good in salads or even as a sandwich filler. I enjoyed just eating them as is for a quick snack.
For one meal this week, I threw them in the wok for some protein with my veggies. Expecting them to just crumble, I was happily surprised when they held their shape and acted like a little meatball! There is such great flavor in these little things and they are a wonderful source of protein for those of us who don't get enough of it from meat.
MY REVIEW: Two good recipes I know I will make again.
JASON'S REVIEW: Jason is currently removing the iceberg featured in the major motion picture "Titanic" from our roof. Perhaps you've seen it? It's safe to say he liked both meals as they were both happily consumed.
Labels:
Aerogarden,
chickpeas,
gluten free,
quinoa,
salad,
vegetarian
Saturday, January 8, 2011
Potato Candy - Recipe From A Memory
Early in the Christmas season, my Grandma was telling me about a special treat her mother used to make her and her sisters at Christmas time. She said there was only 3 ingredients; potato, icing sugar and coconut. In my head, I immediately thought "gluten free"! Having never heard of something like that, I turned to the Internet and found quite a lot of results. Most were covered in chocolate or had some sort of wax in them. Some recommended adding milk and salt to the mashed potatoes. I couldn't find something as simple as my Grandmas memories so I just gave it a shot. Nothing was measured and I will work on trying to perfect this recipe in the future, but here's what I did:
1 medium potato, peeled, cooked & mashed until smooth
Icing sugar (I'm going to say about 2 cups but don't add it all at once)
Approx. 1 cup unsweetened coconut flakes
1 tsp vanilla
I kept adding icing sugar to the potato until it became a dough-like consistency. Once it was thick and not sticking to my hands, I added the coconut. Upon tasted it at this point I decided to add some vanilla extract (vanilla was not one of the original 3 ingredients my Grandma mentioned but she did confirm it was in the original once she sampled mine).
Once I had my dough all mixed, I was really unsure of what to do next. I spread it thin on parchment paper and then stared at it for a while. I couldn't see it really sticking together so I decided I would drizzle some melted chocolate on top. Once I did that, I stared at it again. Seeing this wasn't going to work either, I smooshed all the dough together and started making 1" balls. After a few hours, the balls do harden up and hold their shape nicely.
The verdict - these were SO sweet. I don't have much of a sweet tooth so I couldn't really see anyone eating and finishing a complete ball but everyone tried one (some even two!). My grandma agreed - super sweet but similar to the original. Her mother somehow cut it into bars instead of the balls. My recipe requires some fine-tuning still but it was a fun experiment. If you like cake icing, you will love these!
Thursday, January 6, 2011
Sweet Potato & Coconut Soup with Quinoa
I promise to make something without quinoa tomorrow! I just can't get enough of this Quinoa 365 book. So many fantastic looking recipes in there. I just about made a quinoa chickpea salad to go with this soup but figured that would be overkill. Here is the soup I made this evening:
Sweet Potato & Coconut Soup with Quinoa
2 large sweet potatoes (I used 1 large and I can't imagine how thick this would be with 2!)
2tbsp water
1/2 cup diced onion
1/2 cup quinoa
3 cups vegetable stock
1 cup coconut milk
1/4tsp cayenne pepper
1/4tsp chili powder
1/4cup plain yogurt (optional) (I didn't have any)
Wash and peel the sweet potatoes and cut in 2-3" chunchs. Boil for 5-6 minutes until just soft but not mushy.
Place the water and onion in a large saucepan over medium heat and cook until the onion softens, about 7 minutes. Stir in the quinoa and vegetable stock and bring to a boil. Reduce the heat to medium and cook for about 15 minutes, until the quinoa is cooked.
Add the sweet potato to the saucepan. Puree the mixture with a hand blender. Return to low heat and stir in the coconut milk. Reheat slowly on low, adding the cayenne and chili powder. Ladle into bowls and top each serving with a spoonful of yogurt (if using).
To go with this soup I made salad with a new salad dressing. I halved a recipe that came from Skinny Bitch in the Kitch. I mostly was excited to use the newest ingredient in my pantry which is agave nectar! My salad consisted of lettuce and cucumbers but the dressing made it special ....
2tbsp agave nectar
2tbsp dijon mustard
1/3cup olive oil
2tbsp balsamic vinegar
1 garlic clove minced
salt & pepper
MY REVIEW: The soup was damn thick! A bowl will fill you right up. If you're not the largest fan of coconut, fear not. It's not an overwhelming flavor. I really liked the little bit of spice the cayenne added and just the overall simplicity of the recipe. There was no sauteing the onions in butter so this recipe is 100% lactose free as well (assuming you skip the yogurt). I didn't even have to add any salt or pepper - the natural flavors were enough. Great salad dressing too - even with half the recipe there's quite a bit left over. I just mixed it up in a mason jar and will keep it in the fridge.
JASON'S REVIEW: It was fabulous. I couldn't guess the ingredients - the flavors stood on their own.
Sweet Potato & Coconut Soup with Quinoa
2 large sweet potatoes (I used 1 large and I can't imagine how thick this would be with 2!)
2tbsp water
1/2 cup diced onion
1/2 cup quinoa
3 cups vegetable stock
1 cup coconut milk
1/4tsp cayenne pepper
1/4tsp chili powder
1/4cup plain yogurt (optional) (I didn't have any)
Wash and peel the sweet potatoes and cut in 2-3" chunchs. Boil for 5-6 minutes until just soft but not mushy.
Place the water and onion in a large saucepan over medium heat and cook until the onion softens, about 7 minutes. Stir in the quinoa and vegetable stock and bring to a boil. Reduce the heat to medium and cook for about 15 minutes, until the quinoa is cooked.
Add the sweet potato to the saucepan. Puree the mixture with a hand blender. Return to low heat and stir in the coconut milk. Reheat slowly on low, adding the cayenne and chili powder. Ladle into bowls and top each serving with a spoonful of yogurt (if using).
To go with this soup I made salad with a new salad dressing. I halved a recipe that came from Skinny Bitch in the Kitch. I mostly was excited to use the newest ingredient in my pantry which is agave nectar! My salad consisted of lettuce and cucumbers but the dressing made it special ....
2tbsp agave nectar
2tbsp dijon mustard
1/3cup olive oil
2tbsp balsamic vinegar
1 garlic clove minced
salt & pepper
MY REVIEW: The soup was damn thick! A bowl will fill you right up. If you're not the largest fan of coconut, fear not. It's not an overwhelming flavor. I really liked the little bit of spice the cayenne added and just the overall simplicity of the recipe. There was no sauteing the onions in butter so this recipe is 100% lactose free as well (assuming you skip the yogurt). I didn't even have to add any salt or pepper - the natural flavors were enough. Great salad dressing too - even with half the recipe there's quite a bit left over. I just mixed it up in a mason jar and will keep it in the fridge.
JASON'S REVIEW: It was fabulous. I couldn't guess the ingredients - the flavors stood on their own.
Labels:
agave,
coconut,
gluten free,
salad,
soup,
sweet potato
Saturday, January 1, 2011
Gluten Free Spring Rolls
I got a hot tip from a great gluten-free blog I frequent regularly - The Celiac Husband. They found some locally made, gluten free spring rolls at their local T&T Supermarket in Calgary. Since we live about 10 minutes away from one of the Edmonton locations I thought I would venture down there today and see if I could find them.
Something tells me there are a lot of hidden gems in that market! Salad rolls made with rice paper, a whole aisle of rice noodles, lots of dried vegetables and spices and more sauces than you can imagine. One day when I have time to inspect all of the labels closely I will return. For today, I found what I was looking for and it happened to be on sale for $12.99:
Right on the package it says "Free Flour - Free Gluten - Free MSG - Free Sugar - Free Food Color - Free Preservation". They are also lactose free if you're curious. Made in Edmonton too! It didn't give any instructions on baking these in the oven but I made just one to try out today and cooked it at 350 for 20 minutes. It was hot (VERY hot - don't burn your mouth) and cooked through.
Next time I might try making them on the stove with a spritz of vegetable oil. Although they were good in the oven, the outside didn't get too crispy. Perhaps a couple extra minutes in the oven would do the trick as well.
Something tells me there are a lot of hidden gems in that market! Salad rolls made with rice paper, a whole aisle of rice noodles, lots of dried vegetables and spices and more sauces than you can imagine. One day when I have time to inspect all of the labels closely I will return. For today, I found what I was looking for and it happened to be on sale for $12.99:
Right on the package it says "Free Flour - Free Gluten - Free MSG - Free Sugar - Free Food Color - Free Preservation". They are also lactose free if you're curious. Made in Edmonton too! It didn't give any instructions on baking these in the oven but I made just one to try out today and cooked it at 350 for 20 minutes. It was hot (VERY hot - don't burn your mouth) and cooked through.
Next time I might try making them on the stove with a spritz of vegetable oil. Although they were good in the oven, the outside didn't get too crispy. Perhaps a couple extra minutes in the oven would do the trick as well.
New Years Day Breakfast
Happy New Years to everyone reading this! Hope you all had a fun evening and are looking forward to the year ahead. Jason took me to The Creperie last night - a first for both of us. They take their gluten free foods very seriously there and I felt pretty relaxed eating there. I had my own bread basket with gluten free bread that they bake in-house! We were even able to share a sweet crepe for dessert.
Now on to this morning... I wanted to start off the New Year with something both healthy and delicious. This is the very first recipe in Quinoa 365:
(This photo was taken by Jason - he's got a new camera and was looking for subjects)
Apple Strudel Breakfast Cereal
1/4 slivered almonds
1cup quinoa
2 1/2cups water
1/2cup diced dried apple slices (You can find these at the Italian Market)
1/4cup raisins
1tsp ground cinnamon
1tsp pure vanilla extract
1tbsp brown sugar
1 cup vanilla yogurt (We used locally made Bles-Wold)
Place the almonds in a medium saucepan over medium high heat. Stir frequently until the almonds are toasted and fragrant - about 3 to 4 minutes. Set the almonds aside in a small bowl.
Combine the quinoa, water, apples, raisins and cinnamon in the same saucepan. Bring to a boil, cover and reduce to a simmer for 17 minutes. Stir in vanilla and brown sugar.
To serve: divide between bowls, top with yogurt and sprinkle with toasted almonds.
MY REVIEW: I used half the amount of water and quinoa listed and it made the perfect amount for the 2 of us. When looking at recipes you have to keep in mind quinoa triples in size when it's cooked. This was such a great breakfast! Jason requested it again tomorrow so I know it was a hit. It doesn't sit as heavy in your belly as a bacon and egg meal but it left me feeling just as full.
JASON'S REVIEW: It was a delicious way to start my day. Would eat again. A+ ... 5 stars ... 2 thumbs up.
Now on to this morning... I wanted to start off the New Year with something both healthy and delicious. This is the very first recipe in Quinoa 365:
(This photo was taken by Jason - he's got a new camera and was looking for subjects)
Apple Strudel Breakfast Cereal
1/4 slivered almonds
1cup quinoa
2 1/2cups water
1/2cup diced dried apple slices (You can find these at the Italian Market)
1/4cup raisins
1tsp ground cinnamon
1tsp pure vanilla extract
1tbsp brown sugar
1 cup vanilla yogurt (We used locally made Bles-Wold)
Place the almonds in a medium saucepan over medium high heat. Stir frequently until the almonds are toasted and fragrant - about 3 to 4 minutes. Set the almonds aside in a small bowl.
Combine the quinoa, water, apples, raisins and cinnamon in the same saucepan. Bring to a boil, cover and reduce to a simmer for 17 minutes. Stir in vanilla and brown sugar.
To serve: divide between bowls, top with yogurt and sprinkle with toasted almonds.
MY REVIEW: I used half the amount of water and quinoa listed and it made the perfect amount for the 2 of us. When looking at recipes you have to keep in mind quinoa triples in size when it's cooked. This was such a great breakfast! Jason requested it again tomorrow so I know it was a hit. It doesn't sit as heavy in your belly as a bacon and egg meal but it left me feeling just as full.
JASON'S REVIEW: It was a delicious way to start my day. Would eat again. A+ ... 5 stars ... 2 thumbs up.
Wednesday, December 29, 2010
Leek and Potato Soup
This year Santa made a fantastic book selection. He/she gets me a book each year and this year it was Quinoa 365:
As you can see, I have bookmarked essentially every recipe in the book and also purchased a 3lb bag of quinoa. If you have not tried quinoa and are interested in following along with some of those bookmarked recipes then I do recommend picking up a sack at Costco. That 3lb bag of pre-rinsed quinoa cost $8.49 which is a pretty fine deal. I promise you it's easier to make than rice!
My very first recipe from this book was the Leek & Potato Soup:
3tbsp butter (I used 1tbsp)
2 cups sliced leeks, white parts only
3 cups chicken or vegetable broth
2 1/2 cups peeled and diced Yukon gold potatoes (I used whatever was in the pantry.. not yukon gold)
1/2 cup quinoa
2 cups milk or soy milk
salt to taste
Melt the butter in a large saucepan and saute the leeks until tender, about 8 minutes. Remove 1/2cup of the sauteed leeks and set aside.
Add the broth, potatoes and quinoa to the saucepan and bring to a boil. Cover, reduce to a summer and cook until the potatoes and quinoa are tender, about 18 minutes. Puree the cooked mixture with a hand blender or cool slightly and puree in 2 batches in a blender or food processor. Return the puree to the saucepan and stir in the milk and reserved leeks. Heat on medium but do not boil. Season with salt. Remove from the heat and serve.
MY REVIEW: What a great soup! It was so thick and filling. If you're intimidated by the idea of cooking quinoa then this is a good starting recipe. There's no rinsing or straining involved - the quinoa simply goes from the bag to the pot.
JASON'S REVIEW: It was good.
Revolutionize your nutrition with Quinoa 365!
Keen what?
Pronounced 'keen wah', Quinoa is a frequently neglected and relatively unknown superfood - containing a perfect balance of all eight essential amino acids. It is gluten-free and a great source of protein. Nothing else packs a punch of nutrition quite like quinoa. Quinoa 365: The Everyday Superfood shows you how to add quinoa to all your favorite foods!
"We eat it because it's so nutritious and works with all of our favorite recipes!"
My very first recipe from this book was the Leek & Potato Soup:
3tbsp butter (I used 1tbsp)
2 cups sliced leeks, white parts only
3 cups chicken or vegetable broth
2 1/2 cups peeled and diced Yukon gold potatoes (I used whatever was in the pantry.. not yukon gold)
1/2 cup quinoa
2 cups milk or soy milk
salt to taste
Melt the butter in a large saucepan and saute the leeks until tender, about 8 minutes. Remove 1/2cup of the sauteed leeks and set aside.
Add the broth, potatoes and quinoa to the saucepan and bring to a boil. Cover, reduce to a summer and cook until the potatoes and quinoa are tender, about 18 minutes. Puree the cooked mixture with a hand blender or cool slightly and puree in 2 batches in a blender or food processor. Return the puree to the saucepan and stir in the milk and reserved leeks. Heat on medium but do not boil. Season with salt. Remove from the heat and serve.
MY REVIEW: What a great soup! It was so thick and filling. If you're intimidated by the idea of cooking quinoa then this is a good starting recipe. There's no rinsing or straining involved - the quinoa simply goes from the bag to the pot.
JASON'S REVIEW: It was good.
Tuesday, December 28, 2010
Cornish Game Hen with Garlic & Rosemary
As promised, here are my Christmas meal pictures! We made Cornish Hens for the first time. These pictures were taken by Jason's sister, Kate Redfern. I'm so glad she was in the kitchen to snap theses. Cooking and taking pictures is a messy combination and there's no way I would have taken such great photos.
(Ready to go into the oven)
(Coming out halfway through to get basted)
(All lined up and ready to eat... so cute!)
Cornish Game Hen with Garlic & Rosemary
Ingredients
4 Cornish game hens
salt and pepper to taste
1 lemon, quartered
4 sprigs fresh rosemary
3 tablespoons olive oil
24 cloves garlic
1/3 cup white wine
1/3 cup low-sodium chicken broth
4 sprigs fresh rosemary, for garnish
4 Cornish game hens
salt and pepper to taste
1 lemon, quartered
4 sprigs fresh rosemary
3 tablespoons olive oil
24 cloves garlic
1/3 cup white wine
1/3 cup low-sodium chicken broth
4 sprigs fresh rosemary, for garnish
Directions
Preheat oven to 450 degrees F (230 degrees C).
Rub hens with 1 tablespoon of the olive oil. Lightly season hens with salt and pepper. Place 1 lemon wedge and 1 sprig rosemary in cavity of each hen. Arrange in a large, heavy roasting pan, and arrange garlic cloves around hens. Roast in preheated oven for 25 minutes.
Reduce oven temperature to 350 degrees F (175 degrees C). In a mixing bowl, whisk together wine, chicken broth, and remaining 2 tablespoons of oil; pour over hens. Continue roasting about 25 minutes longer, or until hens are golden brown and juices run clear. Baste with pan juices every 10 minutes.
Transfer hens to a platter, pouring any cavity juices into the roasting pan. Tent hens with aluminum foil to keep warm. Transfer pan juices and garlic cloves to a medium saucepan and boil until liquids reduce to a sauce consistency, about 6 minutes. Cut hens in half lengthwise and arrange on plates. Spoon sauce and garlic around hens. Garnish with rosemary sprigs, and serve.
CHEF JASON'S NOTES: Our hens were a little larger than the standard Cornish Hens as they took closer to 2 hours to fully cook. Jason says cook these birds until the juices run clear!
MY REVIEW: These were so pretty to look at and tasted great. We had made 1 per person but there was so much meat on each bird that we all struggled to eat just half of one! Next time we will cook only 2 for 4 people.
Thanks for the pictures Kate!
Friday, December 24, 2010
Gluten-Free Black Bean Brownies
We hosted a Christmas dinner at our home last night and I am still stuffed! Jason's sister, who is a talented photographer, came over early to help with preparation and made us some almond roca. Perhaps, if you're lucky, she'll post the recipe here - it's a rich and delicious Christmas treat! All through preparation she was snapping pictures and I will post them along with some new recipes once she has a chance to organize them. We tried something new this year and I think it was a success.
In the meantime, here are some brownies I made for an after dinner treat. These don't taste weird and gluten free at all. They also don't taste like black beans so don't worry! They're thick and fudgey and I'm pretty sure they're good for you since there's beans in there, right? I got this recipe from the Gluten-Free baking class I took last month and it originally came from Wholes Food Market:
Gluten Free Black Bean Brownies
1 (15 ounce) can no salt added black beans, drained & rinsed
3 large eggs
1/3cup melted butter, more for baking dish (I used parchment paper instead of greasing the pan and it worked)
1/4cup cocoa powder
1/8tsp salt
2 tsp vanilla
1/2cup + 2tbsp cane sugar (I used white sugar)
1/2cup semi-sweet chocolate chips
1/3cup finely chopped walnuts
Preheat oven to 350F.
Butter an 8" baking pan (or line with parchment paper). Place the black beans, eggs, melted butter, cocoa powder, salt, vanilla & sugar in the bowl of a food processor and blend until smooth (I put them in a regular bowl and used my immersion blender. In class, we used a blender. Either works!) Remove the blade and carefully stir in chocolate chips and walnuts. Transfer mixture to prepared pan. Bake the brownies for 30-35 minutes or until just set in the center. Cool before cutting into squares.
Here's something else I wanted to post. This picture is not spectacular but the meal was! A few nights ago I made gluten-free wraps with some new tortillas I found at the Italian Market. First I spread some home-made hummus on the surface. Next came a rice mixture with some chopped spinach I had defrosted in the microwave. I topped this with a chicken breast I had cooked with olive oil and basil - 1 chicken breast was more than enough for 2 wraps. With great difficulty (gluten free wraps break like glass) I wrapped them up in tinfoil and put them in the oven for about 10 minutes at 350. I think the oven step helps them stick together in the end. Voila! A super filling wrap that even Honey was jealous of.
In the meantime, here are some brownies I made for an after dinner treat. These don't taste weird and gluten free at all. They also don't taste like black beans so don't worry! They're thick and fudgey and I'm pretty sure they're good for you since there's beans in there, right? I got this recipe from the Gluten-Free baking class I took last month and it originally came from Wholes Food Market:
Gluten Free Black Bean Brownies
1 (15 ounce) can no salt added black beans, drained & rinsed
3 large eggs
1/3cup melted butter, more for baking dish (I used parchment paper instead of greasing the pan and it worked)
1/4cup cocoa powder
1/8tsp salt
2 tsp vanilla
1/2cup + 2tbsp cane sugar (I used white sugar)
1/2cup semi-sweet chocolate chips
1/3cup finely chopped walnuts
Preheat oven to 350F.
Butter an 8" baking pan (or line with parchment paper). Place the black beans, eggs, melted butter, cocoa powder, salt, vanilla & sugar in the bowl of a food processor and blend until smooth (I put them in a regular bowl and used my immersion blender. In class, we used a blender. Either works!) Remove the blade and carefully stir in chocolate chips and walnuts. Transfer mixture to prepared pan. Bake the brownies for 30-35 minutes or until just set in the center. Cool before cutting into squares.
Here's something else I wanted to post. This picture is not spectacular but the meal was! A few nights ago I made gluten-free wraps with some new tortillas I found at the Italian Market. First I spread some home-made hummus on the surface. Next came a rice mixture with some chopped spinach I had defrosted in the microwave. I topped this with a chicken breast I had cooked with olive oil and basil - 1 chicken breast was more than enough for 2 wraps. With great difficulty (gluten free wraps break like glass) I wrapped them up in tinfoil and put them in the oven for about 10 minutes at 350. I think the oven step helps them stick together in the end. Voila! A super filling wrap that even Honey was jealous of.
Wednesday, December 1, 2010
Jason's Birthday Breakfast!
This a few days overdue but Jason's Birthday was on Saturday so, of course, he got Birthday breakfast! He requested something cheesy and unhealthy. I had just read the perfect recipe in my "Gluten Free For Dummies" book and tried it out for him:
Breakfast Quiche
3 cups frozen hash browns, thawed
1/3cup melted butter (even though this was supposed to be unhealthy, I couldn't bring myself to use that much butter!)
nonstick spray
5 eggs
3/4cup milk
1cup cooked diced ham
1/3 cup diced onion
grated cheese (they recommend 1 cup grated swiss cheese and 1/4cup of both cheddar and monterey jack cheese... I used probably 3/4 marble and 1/2 monterey jack. Use whatever you have)
2tsp chopped fresh basil (I used dried)
salt and pepper to taste
1. Preheat the oven to 325 degrees
2. To prepare the crust, mix the hash browns and butter carefully, making sure the potatoes don't turn to mush
3. Spray a 9" pie plate or quiche pan with nonstick spray. Press the potato-butter mixture evenly on the bottom and sides of the pan.
4. In a large mixing bowl, beat the eggs with an electric mixer for 2 minutes on low speed. Add the milk, ham, onion, swiss, cheddar, monterey jack, basil and salt and pepper. Stir until they're well mixed.
5. Pour the egg mixture into the crust and bake it for 45 minutes. To test whether the quiche is done, insert a knife in the center. If it comes out clean, the quiche is ready.
MY REVIEW: I don't suggest you eat this often and I'm not even particularly proud that I cooked it.... but Jason loved it and I guess that's all that matters on his Birthday! This could easily be made more healthy by adding vegetables - spinach would be a great addition. The ham could be left out for a vegetarian breakfast or if you're a "lazy vegetarian" just pick the ham out! Ever since I've had to become so incredibly aware of what I'm eating with my gluten issues, I can't muster up the energy to care about what meat is on/in/touching my food. I'm really not setting a good example with this post at all.
JASON'S REVIEW: He loved it! Even took his own picture of it. It fueled him to go for a winter bike ride.
Breakfast Quiche
3 cups frozen hash browns, thawed
1/3cup melted butter (even though this was supposed to be unhealthy, I couldn't bring myself to use that much butter!)
nonstick spray
5 eggs
3/4cup milk
1cup cooked diced ham
1/3 cup diced onion
grated cheese (they recommend 1 cup grated swiss cheese and 1/4cup of both cheddar and monterey jack cheese... I used probably 3/4 marble and 1/2 monterey jack. Use whatever you have)
2tsp chopped fresh basil (I used dried)
salt and pepper to taste
1. Preheat the oven to 325 degrees
2. To prepare the crust, mix the hash browns and butter carefully, making sure the potatoes don't turn to mush
3. Spray a 9" pie plate or quiche pan with nonstick spray. Press the potato-butter mixture evenly on the bottom and sides of the pan.
4. In a large mixing bowl, beat the eggs with an electric mixer for 2 minutes on low speed. Add the milk, ham, onion, swiss, cheddar, monterey jack, basil and salt and pepper. Stir until they're well mixed.
5. Pour the egg mixture into the crust and bake it for 45 minutes. To test whether the quiche is done, insert a knife in the center. If it comes out clean, the quiche is ready.
MY REVIEW: I don't suggest you eat this often and I'm not even particularly proud that I cooked it.... but Jason loved it and I guess that's all that matters on his Birthday! This could easily be made more healthy by adding vegetables - spinach would be a great addition. The ham could be left out for a vegetarian breakfast or if you're a "lazy vegetarian" just pick the ham out! Ever since I've had to become so incredibly aware of what I'm eating with my gluten issues, I can't muster up the energy to care about what meat is on/in/touching my food. I'm really not setting a good example with this post at all.
JASON'S REVIEW: He loved it! Even took his own picture of it. It fueled him to go for a winter bike ride.
Wednesday, November 24, 2010
Bean & Quinoa Chili with Corn Souffle
I have 2 brand new, vegetarian and gluten free recipes to share today! With Jason's help chopping tonight, we were able to whip this healthy meal up in about an hour. Here's me seriously whipping:
From the June/July edition of "Living Without", I made Bean and Quinoa Chili:
Bean & Quinoa Chili
1 onion, peeled and chopped
2 cloves garlic, peeled and crushed
2 stalks celery, washed and sliced
2 tbsp extra virgin olive oil
1 1/2tsp chili powder
1 can Italian tomatoes, crushed
1tsp salt
freshly ground pepper, to taste
1cup quinoa, thoroughly tinsed
1 can navy beans
1 can black beans, rinsed and drained
3tbsp chopped flat-leaf parsley
1. Put onion, garlic and celery in a saucepan with the olive oil. Cook gently for 10 minutes or until vegetables soften. Stir in the chili powder and cook for 1 minute. Add tomatoes, saly and pepper and bring to a coil. Cook sauce gently for 25 minutes or until pulpy.
2. Cook quinoa
3. Add drained beans to the tomato sauce and cook for a minute or two. Stir in parsley.
4. Divide quinoa into individual serving bowls and spoon chili on top of quinoa.
Our second dish of the night was from the same library book I've been using lately....
Corn Souffle
1 17ounce can whole kernel corn
3/4cup (approx.) milk or non dairy liquid
1/4cup butter or margerine (I used just a teeny square)
1/3cup cornmeal
3 eggs, seperated
1/2tsp baking powder
1/4tsp salt
dash cayenne pepper
1 to 3 tablespoons bell pepper (I used orange)
3 to 4 sliced green onions
Preheat the oven to 375.
Drain the corn, saving the liqiod. Add the milk to the liquid to measure 1 1/2cups. In a saucepan combine the milk mixture and margerine and bring to a boil. Slowly stir in the cornmeal. Bring back to a boil and cook for 3 minutes, stirring constantly. Remove from heat.
Beat the egg whites until stiff.
To the egg yolks, add the baking powder, salt, cayenne pepper, bell pepper, onions, and corn. Stir the corn mixture into the cooked meal. Fold in the egg whites (As I type this, I realize we reversed the egg whites and yolks in this step and it worked out just fine). Pour into a buttered 1 1/2 quart casserole.
Bake for 30 minutes, or until lightly browned and set.
MY REVIEW: Both dishes were great. The corn souffle tasted more like a breakfast or brunch item than a replacement for corn bread, but still good! You may notice we used red quinoa today inside of the regular stuff.... you prepare it the same and I couldn't taste much of a difference
JASON'S REVIEW: Everything was delicious and I feel 5 years younger.
From the June/July edition of "Living Without", I made Bean and Quinoa Chili:
Bean & Quinoa Chili
1 onion, peeled and chopped
2 cloves garlic, peeled and crushed
2 stalks celery, washed and sliced
2 tbsp extra virgin olive oil
1 1/2tsp chili powder
1 can Italian tomatoes, crushed
1tsp salt
freshly ground pepper, to taste
1cup quinoa, thoroughly tinsed
1 can navy beans
1 can black beans, rinsed and drained
3tbsp chopped flat-leaf parsley
1. Put onion, garlic and celery in a saucepan with the olive oil. Cook gently for 10 minutes or until vegetables soften. Stir in the chili powder and cook for 1 minute. Add tomatoes, saly and pepper and bring to a coil. Cook sauce gently for 25 minutes or until pulpy.
2. Cook quinoa
3. Add drained beans to the tomato sauce and cook for a minute or two. Stir in parsley.
4. Divide quinoa into individual serving bowls and spoon chili on top of quinoa.
Our second dish of the night was from the same library book I've been using lately....
Corn Souffle
1 17ounce can whole kernel corn
3/4cup (approx.) milk or non dairy liquid
1/4cup butter or margerine (I used just a teeny square)
1/3cup cornmeal
3 eggs, seperated
1/2tsp baking powder
1/4tsp salt
dash cayenne pepper
1 to 3 tablespoons bell pepper (I used orange)
3 to 4 sliced green onions
Preheat the oven to 375.
Drain the corn, saving the liqiod. Add the milk to the liquid to measure 1 1/2cups. In a saucepan combine the milk mixture and margerine and bring to a boil. Slowly stir in the cornmeal. Bring back to a boil and cook for 3 minutes, stirring constantly. Remove from heat.
Beat the egg whites until stiff.
To the egg yolks, add the baking powder, salt, cayenne pepper, bell pepper, onions, and corn. Stir the corn mixture into the cooked meal. Fold in the egg whites (As I type this, I realize we reversed the egg whites and yolks in this step and it worked out just fine). Pour into a buttered 1 1/2 quart casserole.
Bake for 30 minutes, or until lightly browned and set.
MY REVIEW: Both dishes were great. The corn souffle tasted more like a breakfast or brunch item than a replacement for corn bread, but still good! You may notice we used red quinoa today inside of the regular stuff.... you prepare it the same and I couldn't taste much of a difference
JASON'S REVIEW: Everything was delicious and I feel 5 years younger.
Labels:
chili,
corn,
egg,
gluten free,
quinoa,
souffle,
vegetarian
Monday, November 22, 2010
Mediterranean Meatballs & *Special* Hummus
I'm in a cooking kind of mood! Today, I tried a Mediterranean meal.
To start, a green salad with tomatoes, olive oil, salt & pepper. Is that Mediterranean? I don't even know:
Now this next dish, I can't take credit for this delicious twist on hummus. I know I read it somewhere, but I cannot recall exactly where as I have so many cookbooks and magazines on the go right now! In one of my books, it suggested topping your hummus with some chopped kalamata olives and feta before putting it in the oven for 30 minutes. I didn't get pita bread so we spread this on normal bread (Udi's gluten free for me!) and used it as a vegetable dip for an appetizer:
I found a great Gluten Free cookbook at the library called "More From The Gluten-Free Gourmet" which is written by Bette Hagman. There are lots of breads in this book which I'm not quite ready to tackle but there were quite a few main dishes as well. That is where I found this recipe for meatballs:
Mediterranean Meatballs
1 1/4 pounds ground turkey
1/3cup grated onion (If you actually grate an onion, be sure to wear eye protection!)
1 egg, beaten
1 1/2tbsp chopped raisins
1tbsp chopped walnuts or pecans (I used walnuts)
1tbsp minced fresh parsley
dash pepper
salt, to taste
1/2tsp cinnamon
1/4tsp allspice
1/4tsp nutmeg
1 1/2tbsp margerine, melted (We only had the real deal.. butter)
1 to 2tbsp vegetable oil (I used olive oil & only enough to stop the balls from sticking)
Preheat oven to 350F.
In a medium mixing bowl, knead together all the ingredients, except the oil until well mixed and smooth. With wet hands, form the mixture into 1-inch balls.
In a frying pan, heat part of the oil. Fry about a third of the balls at a time on medium heat, shaking the pan to keep the balls rounded and brown on all sides. Cook until brown all over. Drain on paper towl and then put in a 2qt casserole. Brown the remaining turkey balls in batches, using more oil if necessary.
When all the meatballs are browned, bake the casserole for 30 minutes to complete cooking. If you prefer, refrigerate the casserole to pull out and finish cooking just before serving. Good both hot and cold.
Oh I forgot to mention, it wasn't just Jason and I for dinner tonight. Someone finally figured out how she could be with us at dinner time WITHOUT sitting on the table and getting sprayed with water:
MY REVIEW: Great meal! The meatballs had a very unique flavor... I was hesitant on the raisins but found that I really enjoyed the sweet flavor and all the spices worked nicely together. They were a little time intensive to make but the house is clean and it's about -40 outside, so what else am I going to do? If I were to make these again, I would attempt to make some sort of sauce to accompany them. Jason suggest a chutney (grape was his thought) would compliment them well and I think that's a damn good idea.
JASON'S REVIEW: The spices and texture was perfect. I really enjoyed this meal. I enjoyed it so much, I organized the dish towels.
To start, a green salad with tomatoes, olive oil, salt & pepper. Is that Mediterranean? I don't even know:
Now this next dish, I can't take credit for this delicious twist on hummus. I know I read it somewhere, but I cannot recall exactly where as I have so many cookbooks and magazines on the go right now! In one of my books, it suggested topping your hummus with some chopped kalamata olives and feta before putting it in the oven for 30 minutes. I didn't get pita bread so we spread this on normal bread (Udi's gluten free for me!) and used it as a vegetable dip for an appetizer:
I found a great Gluten Free cookbook at the library called "More From The Gluten-Free Gourmet" which is written by Bette Hagman. There are lots of breads in this book which I'm not quite ready to tackle but there were quite a few main dishes as well. That is where I found this recipe for meatballs:
Mediterranean Meatballs
1 1/4 pounds ground turkey
1/3cup grated onion (If you actually grate an onion, be sure to wear eye protection!)
1 egg, beaten
1 1/2tbsp chopped raisins
1tbsp chopped walnuts or pecans (I used walnuts)
1tbsp minced fresh parsley
dash pepper
salt, to taste
1/2tsp cinnamon
1/4tsp allspice
1/4tsp nutmeg
1 1/2tbsp margerine, melted (We only had the real deal.. butter)
1 to 2tbsp vegetable oil (I used olive oil & only enough to stop the balls from sticking)
Preheat oven to 350F.
In a medium mixing bowl, knead together all the ingredients, except the oil until well mixed and smooth. With wet hands, form the mixture into 1-inch balls.
In a frying pan, heat part of the oil. Fry about a third of the balls at a time on medium heat, shaking the pan to keep the balls rounded and brown on all sides. Cook until brown all over. Drain on paper towl and then put in a 2qt casserole. Brown the remaining turkey balls in batches, using more oil if necessary.
When all the meatballs are browned, bake the casserole for 30 minutes to complete cooking. If you prefer, refrigerate the casserole to pull out and finish cooking just before serving. Good both hot and cold.
Oh I forgot to mention, it wasn't just Jason and I for dinner tonight. Someone finally figured out how she could be with us at dinner time WITHOUT sitting on the table and getting sprayed with water:
MY REVIEW: Great meal! The meatballs had a very unique flavor... I was hesitant on the raisins but found that I really enjoyed the sweet flavor and all the spices worked nicely together. They were a little time intensive to make but the house is clean and it's about -40 outside, so what else am I going to do? If I were to make these again, I would attempt to make some sort of sauce to accompany them. Jason suggest a chutney (grape was his thought) would compliment them well and I think that's a damn good idea.
JASON'S REVIEW: The spices and texture was perfect. I really enjoyed this meal. I enjoyed it so much, I organized the dish towels.
Labels:
dip,
gluten free,
ground turkey,
hummus,
meatballs
Subscribe to:
Posts (Atom)