Wednesday, April 13, 2011

Stuffed Peppers & Baked Beans

*Ignore my weird spacing and font on this post - I am using Jason's laptop


These 2 recipes were from earlier this week and both from the Simply Recipes site that I've been frequenting. 


First off, some of "Dads Stuffed Peppers" - there was also a "Mom's Stuffed Peppers" which looked pretty good too.... but here's Dad's:
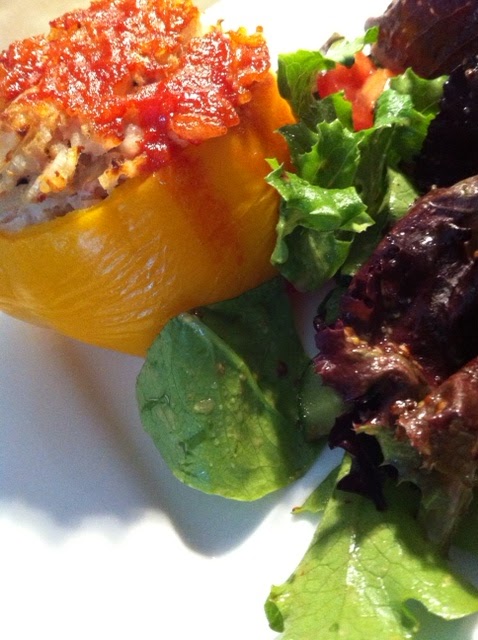
Dad's Stuffed Bell Peppers Recipe

  • Prep time: 10 minutes
  • Cook time: 50 minutes

INGREDIENTS

  • 4 bell peppers, any color (I made 3 and they were kind of squat)
  • Salt
  • 5 Tbsp extra-virgin olive oil (Wow! Don't need that much)
  • 1 medium yellow onion, peeled and chopped
  • 1 clove of garlic, peeled and chopped
  • 1 lb of lean ground beef (Ground Turkey, about 3/4 of a styrofoam flat package)
  • 1 1/2 cup of cooked rice 
  • 1 cup chopped tomatoes, fresh or canned (if using can, drain of excess liquid first) (I chopped fresh)
  • 1 tbsp chopped fresh oregano or 1 teaspoon of dried oregano (dried)
  • Fresh ground pepper
  • 1/2 cup ketchup
  • 1/2 tsp of Worcestershire Sauce (I didn't use this as it's not gluten free - at least my brand wasn't)
  • Dash of Tabasco sauce (Louisiana Hot Sauce)
1 Bring a large pot of water to a boil over high heat. Meanwhile, cut top off peppers 1 inch from the stem end, and remove seeds. Add several generous pinches of salt to boiling water, then add peppers and boil, using a spoon to keep peppers completely submerged, until brilliant green (or red if red peppers) and their flesh slightly softened, about 3 minutes. Drain, set aside to cool.

2 Preheat oven to 350 degrees F. Heat 4 tbsp of the oil in a large skillet over medium heat. Add onions and cook, stirring often, until soft and translucent, about 5 minutes. Add the garlic and cook a minute more. Remove skillet from heat, add meat, rice, tomatoes, and oregano, and season generously with salt and pepper. Mix well. (You may find it easier to put the ingredients at this point into a large bowl and mix together with your hands.)

3 Drizzle remaining 1 tablespoon of olive oil inside the peppers. Arrange the cut side of the peppers up in a baking dish, then stuff peppers with filling. Combine ketchup, Worcestershire sauce, Tabasco sauce, and 1/4 cup of water in a small bowl, then spoon over filling. Add 1/4 cup of water to the baking dish. Place in oven and bake for 40-50 minutes (or longer, depending on how big the peppers are that you are stuffing), until the internal temperature of the stuffed peppers is 150-160°F.

As I only had 3 smaller peppers, I put the remaining stuffing into a small loaf pan and covered with the ketchup sauce. It cooked for as long as the peppers did.


Next up, I made some "Baked Beans in Tomato Sauce" which I will be eating for the next few days!


Baked Beans in Tomato Sauce Recipe


Prep time: 1 hour

  • Cook time: 2 hours, 45 minutes
If you want to save time, you can used canned beans instead of dry. Use 3 or 4 15-ounce cans, drained and rinsed and proceed to step 3. If you want a vegetarian version, skip the bacon, increase the olive oil, and use vegetable stock.

INGREDIENTS

  • 1 pound dry cannellini, borlotti or Great Northern beans (3 cans)
  • 1 Tbsp olive oil
  • 1/4 pound bacon or pancetta, roughly chopped (I didn't use this.. but would recommend you do!)
  • 1/2 medium onion, chopped
  • 4 garlic cloves, chopped
  • 1 Tbsp fresh sage, minced (can sub fresh rosemary) (I only had dried sage)
  • 1/2 to 1 teaspoon chile flakes (depending on how spicy you want it)
  • 2 Tbsp honey
  • 1/4 cup tomato paste
  • 1 15-ounce can crushed tomatoes or tomato sauce
  • 2 cups beef or chicken stock (use gluten-free stock for gluten-free version)
  • Salt
  • 1/2 cup chopped fresh parsley
  • 2 Tbsp balsamic vinegar

METHOD


(I didn't add the bacon but here's the directions as posted on the website. I also do not have a heavy-bottomed pot so I dumped it all into a casserole dish before going in the oven)
1 Pre-soak the beans, either by covering with two inches of water and soaking overnight, or by pouring boiling water over them and soaking them for an hour.
2 Drain the beans and put them in a medium-sized pot and cover with 2 inches of water. Bring to a simmer, cover, reduce the heat to a low simmer and cook until the beans are just soft enough to eat, about 1 hour, give or take 15 minutes or so, depending on how old the beans are (older beans will take longer to cook).
3 Preheat the oven to 325°F. In a 3 or 4 quart heavy-bottomed, oven-proof, lidded pot such as a Dutch oven, heat the olive oil over medium heat. Add the bacon or pancetta and cook slowly until lightly browned and crispy.
4 Add the chopped onions and increase the heat to medium-high. Cook, stirring often, until the onions begin to brown. Use a wooden spoon to scrape any browned bits off the bottom of the pot.
5 Add the garlic, chile flakes and sage and cook for 1-2 minutes, then add the honey and tomato paste. Stir well to combine. Add the tomatoes or tomato sauce and the stock. Bring to a simmer. Taste for salt and add some if needed.
6 Drain the beans and add them to the pot. Stir well. Cover the pot and cook in the oven for an hour and fifteen minutes. If still a bit wet, remove the cover and cook for 15 minutes more. Note that the cooking time will depend on several things, the most important being how thoroughly the beans were cooked to begin with when they were simmered. If they are still a bit hard when they go in the oven, it may take several hours to soften them, once the tomato and honey have been added.
7 Right before serving, gently stir in the chopped parsley and balsamic vinegar. Taste for salt, add more if needed to taste.
Serve either hot or at room temperature.

These were both great recipes - Jason gave the peppers a 10/10! The beans make ALOT... would be good for a large family dinner or potluck. I loved the addition of balsamic vinegar and could really taste it. 

Saturday, April 2, 2011

Honey-Mustard Lime Crock Pot Chicken

For this crockpot chicken, I did have to go and purchase the chicken drumsticks but everything else I had on hand. The ingredients are very simple and it takes 10 minutes to throw it all together. I found it on this Meal Planning website and it had already been adapted from a non-crock pot recipe on another blog:

8 chicken legs (I removed the skin as crock pot + chicken skin = slime)
1/2 cup honey mustard (or 2 tbsp honey mixed with 1/3 cup Dijon Mustard)
1 lime, juice and zest (or 3 tbsp lime juice)
2 garlic cloves, minced
1 tbsp soy sauce

Combine all ingredients in the slow cooker, and stir to evenly coat the chicken. Cook on low 6-8 hours or until chicken is cooked all the way through. I cooked on high for about 3 and a half hours. Serve with rice (and steamed broccoli!) to spoon extra sauce on top.

In the spirit of using up some of the things in the freezer, I made a gluten-free crisp with some frozen raspberries and cranberries from our vast collection of frozen fruit.
Now this - I really don't have a recipe for! I was trying to experiment with alternative, natural sweeteners as opposed to putting brown sugar in the topping. The topping is a mixture of rice flour, quick rolled oats (gluten free variety), honey, agave nectar, chopped walnuts & 1/8cup margarine. I baked it in the oven at 350 until it smelled good. Aren't I just the best recipe writer ever??

Both of these dishes were a success! Its amazing the things you can throw together when you really start digging around in the freezer.

Sunday, March 27, 2011

*Mom's Ground Turkey & Peppers

*Not my moms.

Before I get into this new recipe, let me say I have tried to post a few times in the last few weeks but things just weren't working out for me! My most recent attempt was crab cakes. Not only was the flavor bad, but they did not hold their shape. No sense posting a horrible recipe! I am still cooking and still eating however so don't fret. Hopefully I'll have some more successful recipes for you soon.

Now, check out this site I found for some gluten free recipes:

http://simplyrecipes.com/recipes/gluten-free/

As a very visual cook, I love the fact there's a picture beside each and quite often additional pictures of the steps. There's quite a few things in the list that I would like to try. While reading through them, I found that most of the ingredients are things I would normally have in my fridge or pantry. This works well with my project for the next 2 weeks: buy only fruits and vegetables for groceries and use what's already in the freezer in pantry. We have so many dried things and frozen things and pastas kicking around that I need to use up! They aren't going bad but they are taking up space and the collection seems to grow a little bit each time we do our Sunday grocery shop.

Here's what I tried tonight (with a package of already purchased & forgotten ground turkey):

*Mom's Ground Turkey & Peppers

Ingredients

  • Olive oil
  • 1 cup chopped yellow onion, including some chopped greens from scallions or green onions (just had the yellow onion)
  • 1 bell pepper (red or yellow preferred), chopped (I used yellow)
  • 2 cloves garlic, minced
  • Kosher salt
  • 1 lb ground turkey, preferably ground turkey thighs
  • 1 teaspoon chipotle powder or chili powder (or to taste) (chili powder)
  • 2 Tbsp chopped fresh parsley or cilantro (I used parsley)

Method

1 Heat 2 Tbsp olive oil in a large skillet on medium high heat. Add the chopped onions and bell pepper and cook until onions and peppers are softened, a couple minutes. Add the garlic and cook 30 seconds more.

2 Push the vegetables to the edge of one side of the pan and position that side of the pan so that it is off the burner, away from the heat. The empty part of the pan should be right over the burner. Add one or two more tablespoons of oil to coat the empty part of the pan. Put crumpled chunks of ground turkey in the pan, sprinkle with salt and chipotle or chili powder.

3 Cook the turkey without stirring until it is browned on one side, then turn the pieces over to brown the other side. Once the turkey is just cooked through, stir in the onions and peppers, and sprinkle with more salt and chili powder to taste. Remove from heat. Stir in fresh chopped parsley or cilantro.
Serve alone, or with steamed rice or noodles.
Serves 4.

To go with the turkey and peppers, I made some Russian Buckwheat (from the Italian Market). Despite the suspicious name, it is gluten free. It's also full of fiber and a nice change from the usual rice or quinoa. Once it's cooked I just add a little salt.

MY REVIEW: This was a good meal! I don't usually cook my ground turkey in that manner but it worked nicely and left the meat in larger pieces than usual. It was a quick and colorful dish.

JASON'S REVIEW: The turkey was hearty and delicious.

Tuesday, February 22, 2011

Gluten Free Crepes

Crepes were always one of those things I never imaged I could successfully make. After I fell in love with a street crepe in Paris, I added it to my "list of things to do when I get home". I recently saw that local blogger Chris, from 'Eating Is The Hard Part', made some gluten free crepes! He used a flour mix from the GF Patisserie in Cochrane which I just so happened to make a stop at on Saturday. Wanting to try my new flour and craving a sweet treat, I attempted my first crepe. Here is the recipe, as posted on Chris's blog:

2 Cups GF Patisserie Flour mix
1 1/2 Cups Milk (adjust to make thin batter)
4 Eggs

1. Blend, or whisk the ingredients.
2. Pour 1/4 to 1/3 cup of batter into hot, greased pan.
3. Cook 1-2 minutes a side.
4. Remove to cutting board and fill with anything your heart desires. Ham. Cheese. Fruit. Ice Cream. Steak. Spinach…

My crepes were filled a thin layer of nutella and topped with stewed raspberries.  I was very surprised at how easy these were to make! The crepe pictured above was my middle crepe - I made one thinner and one thicker than that. The thinner one was much easier to flip and tasted so delicate and perfect. I will definitely be trying these again soon and getting a little more creative with fillings and toppings. 

Friday, February 18, 2011

Do you love butter?


Chickpea & Sausage Soup

This lovely (or should I say... "lusty") soup was from the Edmonton Sun:

CHICKPEA AND SAUSAGE SOUP
This lusty soup has with an aroma that greets you as you walk in the door.

1 Tbsp. (15 ml) olive oil
3/4 lb. (375 g) fresh Italian sausage or chorizo (we used gluten-free Italian sausage from the Italian Market)
1 large onion, chopped
3 large cloves garlic, sliced
1/2 tsp dried thyme
1/4 tsp pepper
1 can chickpeas
1 carton (900 ml) sodium-reduced chicken broth
1 Tbsp tomato paste
Salt
2 cups lightly packed shredded spinach

In large heavy-bottomed saucepan, heat oil over medium heat. Add sausage; brown well, about 10 minutes. Let cool on cutting board. Slice thinly.

Meanwhile, drain off all but 1 Tbsp. (15 ml) fat. Add onion, garlic, thyme and pepper; saute for 5 minutes.

Drain and rinse chickpeas; mash half with fork. Add mashed and whole chickpeas to onion mixture along with sausage, chicken broth and tomato paste. Bring to boil, reduce heat to low; simmer covered until flavours blend and broth thickens slightly, about 30 minutes. (Make-ahead: Let cool 30 minutes. Refrigerate uncovered in containers until cold. Cover; refrigerate for up to 3 days; reheat.)

Taste, adding salt if desired. Stir in spinach; let stand 1 minute.

Makes 6 servings.

Wednesday, February 2, 2011

Aero Garden!

The Aerogarden has been growing for over a month now and it's fantastic! So far I've only used the basil once on a pizza. I keep forgetting I have fresh herbs! You can see my little stack of basil in the bottom left corner:
Lately there's been a lot of stir fries and pizzas. My new favorite thing to use is rice noodles! I didn't realize all you have to do is soak them in water before using them. All I do is cook up either shrimp or chicken, throw in some vegetables with a mix of garlic, ginger and curry powder and then add the noodles with some soy sauce and vegetable broth.  Both Jason and I love this quick supper! If you go to T&T you will find every thickness and style of rice noodles imaginable.. and they're cheap.